When it comes to boiling water, cooking, and making coffee while on backpacking trips, one of the most important items of gear to bring with you is a reliable backpacking stove.
This buyer’s guide explains the different types of camp stoves and the pros and cons of each, from integrated all-in-one gas canister stoves to backpacking wood stoves and simple alcohol stoves.
Click here to jump down to read our buyer’s guide, or keep reading to see our list of the best stoves for backpacking.
Best Backpacking Stoves – Table of Contents
- Best Lightweight Backpacking Stove ↓
- Best All-In-One Backpacking Stove System ↓
- Lightest Backpacking Stove ↓
- Fastest-Boiling Stove System ↓
- Best Remote Canister Stove For Backpacking In All 4 Seasons ↓
- Best Wood-Burning Backpacking Stove ↓
- Electricity-Generating Stove With USB Charging ↓
- Best Alcohol Burner Stove For Minimalists ↓
- Most Versatile Hybrid-Fuel Stove For Travel & Cold Weather ↓
- Best Backpacking Canister Stove For Cooking ↓
- Best Solid Fuel Cooking System For Backpacking At Altitude ↓
- HOW TO CHOOSE: Backpacking Stoves Buyer’s Guide ↓
All-Round Best Lightweight Backpacking Stove
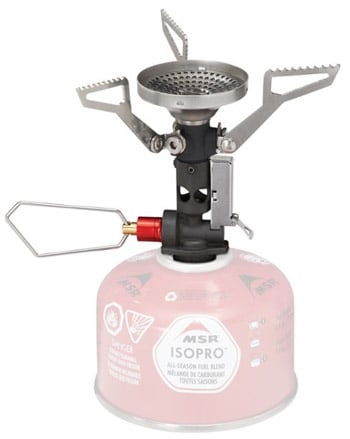
1. MSR Pocket Rocket Deluxe
- Choose if you: want a reliable, easy-to use, ultralight and compact backpacking stove with pressure regulation for use in 4 seasons
- Type: Canister stove
- Cost: $70
- Weight: 2.9oz
- Average Boil Time: 3 mins 18 sec
- Dimensions: 3.3 x 2.2 x 1.8
With a broader burner head than previous MSR stove models, the Deluxe version of the popular ultralight Pocket Rocket stove features a Piezo push-start button for ignition, is capable of simmering (by virtue of being a pressure-regulated system), as well as achieving a speedy boil time.
Pair it with a titanium pot like this one (which weighs 2.8oz) for an ultralight cooking setup.
It’s truly a great all-round ultralight backpacking stove when weight is your primary concern but you also want to do more than just boil water.
If you’d prefer an even more lightweight MSR stove, go for the Pocket Rocket 2, which doesn’t have the push-button start or as large a burner head, but weighs 0.3oz less and is $25 cheaper.
Need a great backpack to carry all your gear? Read this next: Best Backpacking Backpacks for Men and Women
Best Backpacking Stove System

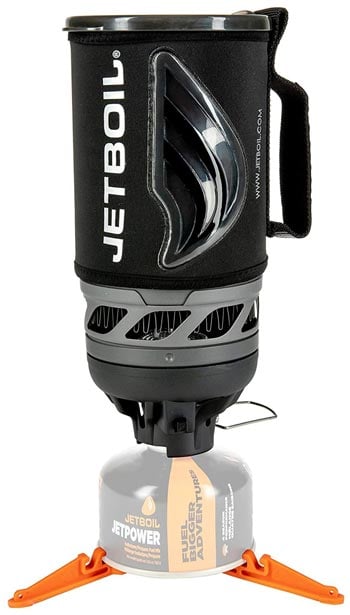
2. JetBoil Stash
- Choose if you: are looking for an ultralight and compact all-in-one backpacking stove system
- Type: Canister stove system (stove, 0.8 liter pot, stabilizer, lid)
- Cost: $130
- Weight: 7.1oz
- Average Boil Time: 5 minutes
- Dimensions: 4.4 x 5.1 when packed
If you’re looking for a simple, all-in-one lightweight backpacking stove system that comes with everything you need (except the gas canister), the Jetboil Stash is our top pick.
While the time it takes to reach a boil is not as speedy as the very popular Jetboil Flash (more on that one, later), it’s half the weight and very packable when backpack storage may be a concern, as as well as weight.
If you don’t need to use your stove in all four seasons, and do not anticipate using it often in very cold weather, then this is a great choice.
|
|
$149.99
8
new
from $149.99
|
See Deal |
|
|
$134.95
out of stock
|
See Deal |
Lightest Backpacking Stove

4. Snow Peak LiteMax Titanium
- Choose if you: enjoy ultralight backpacking and thru-hiking, and having the lightest possible gear is your top priority
- Type: Gas canister stove
- Cost: $60
- Weight: 1.9oz
- Average Boil Time: 4 mins 25 sec
- Dimensions: 3 x 2.7 x 1.3
For the lightest possible gas canister camping stove, the Snow Peak LiteMax is our top pick.
While similar to the MSR Pocket Rocket 2 (which weighs 2.7oz), it is a little lighter and so wins over as the lightest backpacking stove on this list (although we prefer the Pocket Rocket Deluxe’s push-button ignition and broader burner head).
This tiny stove can pack away inside your cooking pot together with the rest of your backpacking cooking gear.
Pair it with Snow Peak’s Trek 700 pot (which weighs 4.8oz) or a lighter pot like this TOAKS 650ml one (which weighs only 2.8oz), for an ultralight, yet effective, three-season backpacking stove system.
Fastest-Boiling Stove System
5. Jetboil Flash
- Choose if you: want a neat, fast-boiling backpacking stove system which is less than 1lb in weight
- Type: Gas canister stove system (stove, pot, stabilizer)
- Cost: $110
- Weight: 13.1oz
- Average Boil Time: 3 mins 20 sec
- Dimensions: 7.1 x 4.1
If your priority is being able to quickly and efficiently boil water for hot drinks and rehydrated backpacking meals, the hugely popular Jetboil Flash is our top pick.
As it’s an all-in-one system you get everything you need in one neat package (except the gas canister, of course) and it’s able to boil water in 100 seconds.
For a lighter cooking system (albeit with a slower time to boil), look at the Jetboil Stash, featured above.
If you want to be able to cook on a Jetboil system, rather than just boil water, also consider the MiniMo, which also includes a 1 liter pot, has ‘simmer’ capability and performs better in cold weather.
Otherwise, this less expensive and slightly lighter Flash system may be a better choice for you.
|
|
$124.99
8
new
from $124.99
|
See Deal |
|
|
$129.99 | See Deal |
|
|
$109.95
out of stock
|
See Deal |
Best Remote Canister Stove For Backpacking In All 4 Seasons
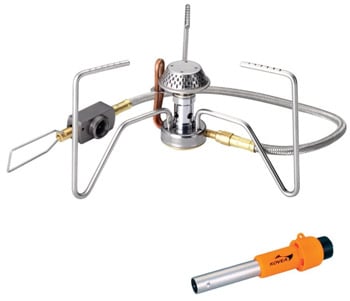
6. Kovea Spider
- Choose if you: want a simple, stable and great value backpacking stove that uses gas canisters and will work in all 4 seasons
- Type: Gas canister stove
- Cost: ~$60
- Weight: 6 oz
- Average Boil Time: n/a
- Dimensions: 5.51 x 3.54 x 5.71
Being a remote canister stove (as opposed to one that screws onto the top of the gas canister), you can invert the gas canister to get better performance in cold weather or low-gas situations, which means it is better suited for backpacking in colder temperatures.
At a 6oz weight and with folding legs, this is a light and compact 4-season cooking option, even if you add on the weight of a windscreen.
The drawback of the Kovea Spider is that it only works with the propane-isobutane canisters, so you don’t have the liquid multi-fuel capability of the MSR Whisperlite models described above.
However, for overall simplicity and ease of use in all four seasons, this is a great value, lightweight backpacking stove.
Best Backpacking Wood Stove

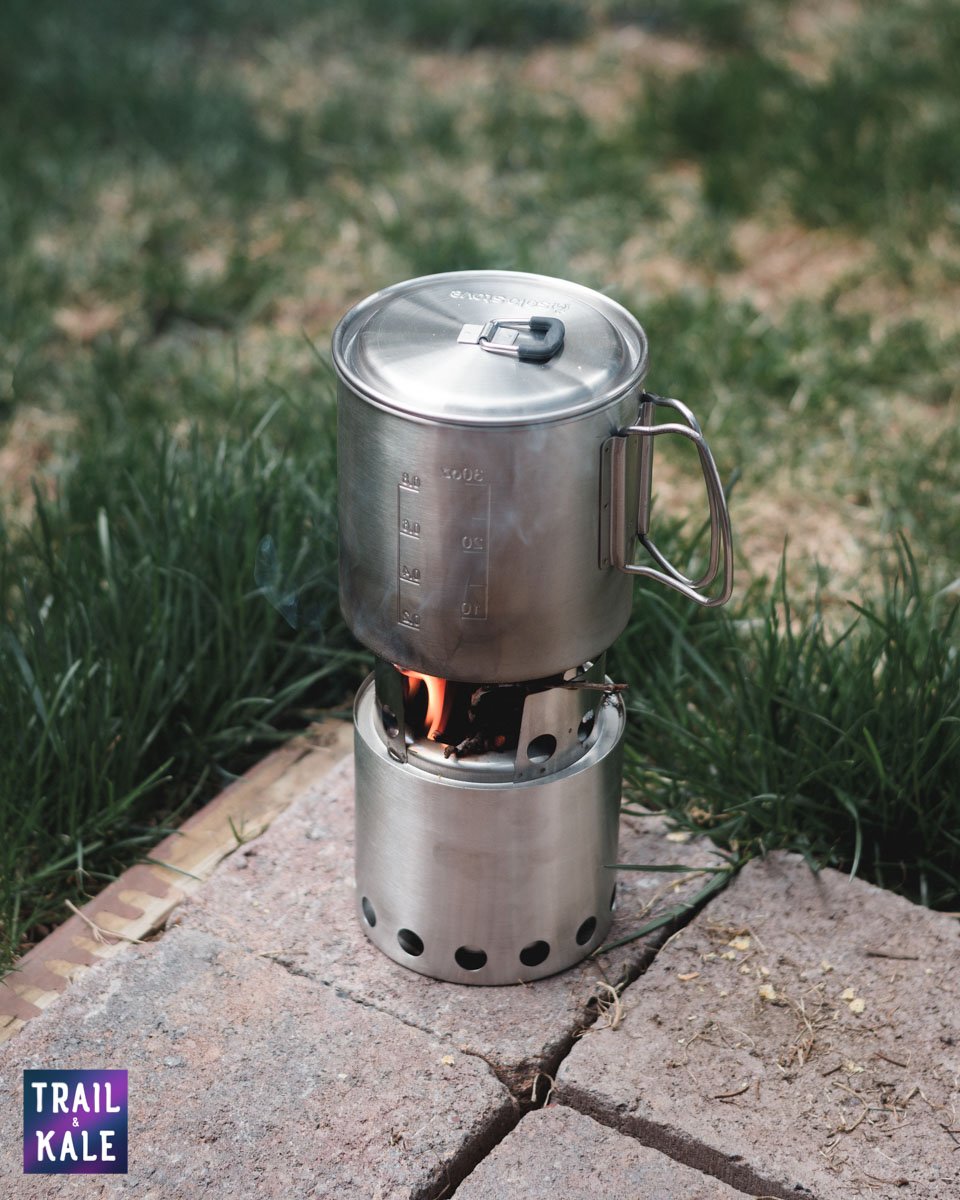
7. Solo Stove Lite
- Choose if you: Enjoy the simplicity of wood-burning stoves or are weight-conscious and don’t want to carry gas or liquid fuel on the trails
- Type: Wood-burning stove
- Cost: $70
- Weight: 9oz (stove and cooking ring)
- Average Boil Time: 8-10 mins
- Dimensions: 5.7 x 4.25
The Solo Stove Lite is a neat backpacking solution for those that enjoy a wood-burning stove and are confident of being able to find the right twigs and tinder to get it going (in areas where wood-burning stoves are permitted).
This backpacking stove can also be used with an alcohol burner (like the Solo Stove-branded one mentioned below) as a back-up fuel source.
Once the cooking ring is stored away inside the stove, it packs down small to easily fit inside a backpack.
It’s also a lightweight choice – consider that you don’t need to carry a fuel bottle or gas canister, although a windscreen and backup alcohol burner may be useful.
If you’re buying your backpacking cookware from scratch then also check out the Solo Stove Lite kit that comes with a stainless steel pot (that it nests inside of), windscreen and the alcohol burner as well as other fire-making accessories.
Electricity-Generating Wood Camp Stove

9. Biolite CampStove 2+
- Choose if you: want to harness your stove’s energy to also charge your phone and other gadgets
- Type: Wood-burning stove
- Cost: $150
- Weight: 2.06lb
- Average Boil Time: 4 mins 30 sec
- Dimensions: 5 x 8
This award-winning backpacking camp stove from BioLite Energy creates a smokeless flame and can generate 3W of power for USB charging of phones, headlamps and other small gadgets, as well as storing charge in its own battery, so you don’t need to pack a separate battery bank to charge electronics.
It also includes a flex-light for illuminating the area while you’re cooking.
We recommend considering the CampStove 2+ together with the 1.5 liter BioLite ‘Kettlepot‘ which is designed for cooking meals in as well as acting as a storage container for the stove – and this all packs down to the size of a 32oz water bottle when not in use.
You can also take the luxury up a notch by getting the complete campstove cook kit, which includes a small grill and coffee press.
|
|
$149.95 | See Deal |
|
|
$223.09
1
new
from $223.09
|
See Deal |
Best Alcohol Burner Stove For Minimalists

10. Solo Stove Alcohol Burner
- Choose if you: want a simple and inexpensive way to heat water when backpacking
- Type: Alcohol burner stove
- Cost: $20
- Weight: 3.5oz
- Average Boil Time: 5-7 mins
- Dimensions: 2.9 x 1.8
This small backpacking camp stove will burn using a range of alcohols, including denatured alcohol, ethanol, methylated spirits, marine stove fuel and methanol.
Denatured alcohol is the best choice as it’s a renewable plant-based fuel that is easy to locate in sporting and hardware stores and burns efficiently without producing soot or smoke.
It may not be as efficient as a liquid fuel or gas canister stove, but it does feature a flame regulator to help you control and extinguish the flame, and features a leak-resistant gasket so you can store unused fuel inside the stove while backpacking.
You can use it as your sole cooking stove, or it makes a great backup to the Solo Stove Lite or other wood-burning stove systems like the BioLite option above.
Most Versatile Hybrid-Fuel Stove For Travel & Cold Weather

3. MSR WhisperLite Universal
- Choose if you: want a stove you can take backpacking anywhere, including international travel, in cold climates and at higher elevations
- Type: Liquid fuel and canister gas-fuelled stove
- Cost: $150 (bottle sold separately for ~$22)
- Weight: 14.9oz (packaged), 11.2oz (minimum) excluding fuel bottle (sold separately)
- Average Boil Time: 3.5 mins (white gas)
- Dimensions: 4 x 4
The MSR WhisperLite Universal is, in our opinion, the best backpacking stove to choose if you need the versatility to use a range of different liquid fuels, as well as the option to use it with gas canisters.
Like other liquid fuel-compatible backpacking stoves, it is not as light as the simpler gas canister stoves, but you can’t beat it if you expect to need to use it internationally or for cooking at elevation or in cold climates.
If you don’t need the canister compatibility and just want a stove that uses liquid fuels of different types, go for the MSR’s other WhisperLite stove, the ‘International‘, which is lighter than the Universal and $40 less expensive.
Best Backpacking Canister Stove For Cooking

8. JetBoil MiniMo Cooking System
- Choose if you: want to be able to cook (and simmer) rather than just boil liquids on your backpacking stove
- Type: Gas canister stove (pressure-regulated)
- Cost: $150
- Weight: 14oz
- Average Boil Time: 4 mins 30 sec
- Dimensions: 5 x 6
If you like the idea of an all-in-one cooking system but want to be able to use it in cold weather then look at the JetBoil MiniMo cooking system.
This system features pressure regulation, making it more reliable than the Flash for use during colder winter backpacking trips (although not as efficient as liquid fuel or remote canister stove options).
While the Flash offers a quicker boil time than the MiniMo, so the MiniMo is a better choice if you want to be able to cook on it as it is designed to be able to simmer, rather than just boil.
For a smaller and lighter version for solo backpacking, also look at the MicroMo, which has an 0.8 liter capacity and weighs less (12oz) compared to the MiniMo’s 1 liter pot capacity and 14oz weight.
|
|
$164.08
12
new
from $164.00
|
See Deal |
|
|
$149.95
out of stock
|
See Deal |
Best Solid Fuel Cooking System For Backpacking At Altitude

11. Esbit Solid Fuel Stove and Cookset
- Choose if you: want to heat water and make simple meals when in the mountains without carrying a heavier liquid fuel stove up there
- Type: Solid (tablet) fuel stove and pot
- Cost: ~$25
- Weight: 7oz
- Average Boil Time: n/a
- Dimensions: 3.4 x 4.4
This lightweight Esbit stove is a great choice if your backpacking trips may take you up into the mountains or at altitude where slower boiling times and wind exposure is a concern.
Included in this set is a 590ml pot with folding, silicone-covered handles, which the stove packs neatly inside of when stowed in your backpack.
|
|
$38.59
3
new
from $29.89
|
See Deal |
Backpacking Stoves Buyer’s Guide
When working out how to choose the best backpacking stove for your needs, it’s important to note that any choice is going to be a trade-off between features.
Most notably, as with pretty much all backpacking gear, the big decision to be made is between ease of use and convenience vs. overall weight and, to some degree, cost.
The following are key considerations that will help narrow down the choice and help you find the right cooking setup for your needs and preferences:
Weight – Your overall tolerance for carrying weight (do you want to go ultralight or do you value features and convenience over lightweight minimalism?)
Efficiency and ease of use – How quickly and efficiently you want to be able to boil water, cook meals, make coffee or melt snow
Packed size – how small does the stove pack down and will it (plus its fuel and cooking pot) fit in your backpack?
Weather, climate and location you’ll use it in most – in particular, whether you expect to be using your stove in very cold temperatures or at altitude, as well as whether you expect to be cooking in relatively windy conditions
What you’ll be cooking – Whether you just need to boil water or if the stove needs to have a ‘simmer’ capability – plus, how quickly you want all that to happen
Fuel preference – What fuel you will have ready access to as well as how much it weighs relative to the alternatives
International backpacking trips – Whether you intend to be using your stove in other countries, as this means you need to consider what types of fuel you will have available to you in those places
Budget – how much you’re willing to spend on a backpacking stove. The good news is that it’s difficult to spend more than $150, so this is not the most expensive piece of backpacking gear you’ll have to buy. You’ll most likely spend more on your backpack, sleeping bag and sleeping pad, for example.
Types of backpacking stove

The first thing to know about backpacking stoves is that there are four main types of stove that are commonly used by backpackers and thru-hikers, and each has its pros and cons:
Canister stoves
When it comes to ease of use, canister stoves are our top pick for backpacking.
These systems use a fuel canister of a blend of isobutane-propane.
While not as lightweight or cheap as simple alcohol stoves, they’re low-mess, high-convenience, and even more so if you choose an all-in-one integrated canister stove setup such as the popular Jetboil Flash cooking system.
Related Reading:


Pros:
Canister stoves small and simple to use, with little to no maintenance needed. Some options have a simmer capability for cooking as opposed to simply boiling.
The fuel canisters self-seal so there’s no risk of spilling fuel and they’re overall lighter than liquid fuel cooking setups.
Cons:
The canisters used by these systems need replacing and specialist recycling.
Integrated canister stoves do not perform as well as liquid fuel stoves in the cold (although a stove with a pressure regulator will help) and may freeze up.
Having your canister freeze up is not really a concern if your intended use is primarily in summer and less extreme climates.
Non-integrated canister stoves can be better for use in lower temperatures as they allow you to invert the canister to help with pressure.
Integrated vs non-integrated canister stoves

An integrated canister stove is essentially an all-in-one solution for cooking in the backcountry, and will include the stove itself, which screws onto the fuel canister, and a pot for cooking your meal or boiling water in.
Having a non-integrated canister stove (also referred to as a ‘remote canister’ setup), on the other hand, means that you can locate the gas canister separately from the burner, meaning it can be easier to balance pots on the stove and you can use a windscreen.
Using a remote canister stove also means you may get a stronger flame in conditions such as when it’s cold or you’re getting low on fuel, where an integrated stove may struggle to provide sufficient pressure, as you’re able to invert the canister to help it out.
These remote canister systems do, however, tend to be a little bulkier than the integrated systems.
Liquid fuel stoves
Liquid fuel setups are the best backpacking stoves for specific conditions, in particular for cooking in colder and higher-altitude locations.\
They are also a more versatile option for taking backpacking internationally, as liquid-fuel stoves are usually designed to be used with a range of liquid fuels.
The types of fuels range from ‘white gas’ which is available throughout the USA, to other fuel sources which may be more readily available overseas, including unleaded gasoline, kerosene and diesel.
Related Reading:


The fuel compatibility may vary between models so it’s worth checking what fuels are most commonly available in destinations you intend to spend time backpacking in, before you go.
Pros:
Liquid fuel stoves are lower-profile and offer greater stability than integrated canister stoves, with better performance in cold temperatures and at altitude.
The fuel bottles are also re-fillable, so you don’t have the issue of finding suitable recycling facilities.
Cons:
These cooking systems are more complicated than other backpacking stoves, and require maintenance and need priming.
They also tend to be heavier (especially when considering the weight of the fuel) and you have the risk of spilling fuel.
With that said, these stoves are a great choice if you regularly camp, especially in the cold or up high, or want to be able to take your backpacking stove internationally and be able to source fuel locally.
However, if you’re not planning to be backpacking overseas or doing a lot of cooking in winter and at higher elevations and are more focused on having a lightweight, easier to use and lower-maintenance cooking system, canister stoves are usually a better choice.
Wood burning stoves
Wood burning stoves are designed to burn dry twigs and other natural debris rather than using a gas or alcohol-based fuel.
Pros:
If you’re going to be cooking and boiling water with a wood burning stove, you don’t need to carry fuel canisters.
This style of camp stove may appeal if you like the idea of backpacking and working with natural fuel sources, and you can also get higher-tech models that can power chargers for your phone and other electronics, which is a pretty cool innovation.
Related Reading:


Cons:
To be able to safely and responsibly use one of these you need to be backpacking somewhere where fires are permitted and wildfires are not a concern.
You also need to be confident that you’ll be able to source suitable dry fuel.
Wood-burning backpacking stoves also take longer to bring to a boil, control the heat (in order to get to a simmer, for example) and leave a sooty residue on the stove and pot after each use.
A wood-burning backpacking stove is not necessarily the most reliable option if you’re going to be camping in different places each night and need reliable access to a fuel source and to be somewhere safe and suitable for using a wood-burning stove.
However, it is a great choice if you’re confident that you’ll be able to use it safely and enjoy the process of cooking with a wood fire.
Alcohol Stoves
The humble alcohol backpacking stove is particularly appealing to minimalist backpackers and thru-hikers who are going for the simplest, ultralight setup, and the fuel is easy to find in most camping destinations.
Included in this category are solid-fuel tablets, which are also low in weight and light easily. Solid tablet-fueled backpacking stoves are popular with people wanting fuel that’s easy to find and not liquid.


Pros:
An alcohol stove is a simple and cheap way to cook in the backcountry.
These setups are typically lightweight and low-maintenance, plus the fuel is easy to source in most camping areas and it’s simple to monitor your consumption and when a resupply is needed.
You may have more success getting a strong flame using solid fuel tablets when backpacking up in the mountains, compared to canister stoves.
Cons:
You’ll probably need to invest in a windscreen to protect the flame and help improve the time to get to a boil, which generally takes longer than with the other types of fuels.
The solid-fuel tablets can smell and leave a greasy residue on your stove and pot.
Backpacking cooking pots
The all-in-one cooking systems in this list already include cooking pots designed to work with those particular stoves.
If you need to buy a pot to use with your stove and are trying to keep the weight as light as possible, opt for titanium or aluminum rather than stainless steel pots.
Also consider whether you’ll be cooking for one or more people, as this may influence your choice when it comes to what size cooking pot to buy.
A 1 liter pot is usually a good choice as it should just about provide enough hot water when cooking simple rehydrated sachet meals or making coffee for two, but if you’re backpacking solo you can get away with a smaller pot that will weigh less and take up less space in your backpack.
Backpacking stove extras
Depending on the type of stove you go for and where you intend to take it backpacking, you may need to consider getting the following extras:
- Windscreen – to protect the flame in wind-prone conditions
- Stove stabilizer (or canister stand) – to help hold your stove level and upright
- Storm matches and lighter – even if your stove has a built-in starter button these can fail so it’s worth ensuring you have an alternative way to light it
- A spork – if you’re going ultralight, our top recommendation is to pack a titanium spork.
Backpacking stove safety
Always read the manufacturer’s instructions and check you’re using the right type of fuel and lighting method.
For safety’s sake, do not use your backpacking stove inside a tent or other enclosed space, or near dry vegetation.
It’s also super important to ensure it’s safe to use your stove in the places where you’ll be backpacking. Fires may be banned or unsafe in areas with a risk of wildfires, for example.
Now you’ve read the buyer’s guide, click here to jump up to see our list of the best backpacking stoves.