We are in the process of converting our Mercedes Sprinter Van into a luxurious off-grid Tiny Home on Wheels, which will serve as Trail & Kale’s mobile office, hotel, and transport all rolled into one.
The first stage of converting our van was to ensure that we have sufficient heating, ventilation and natural light in our van.
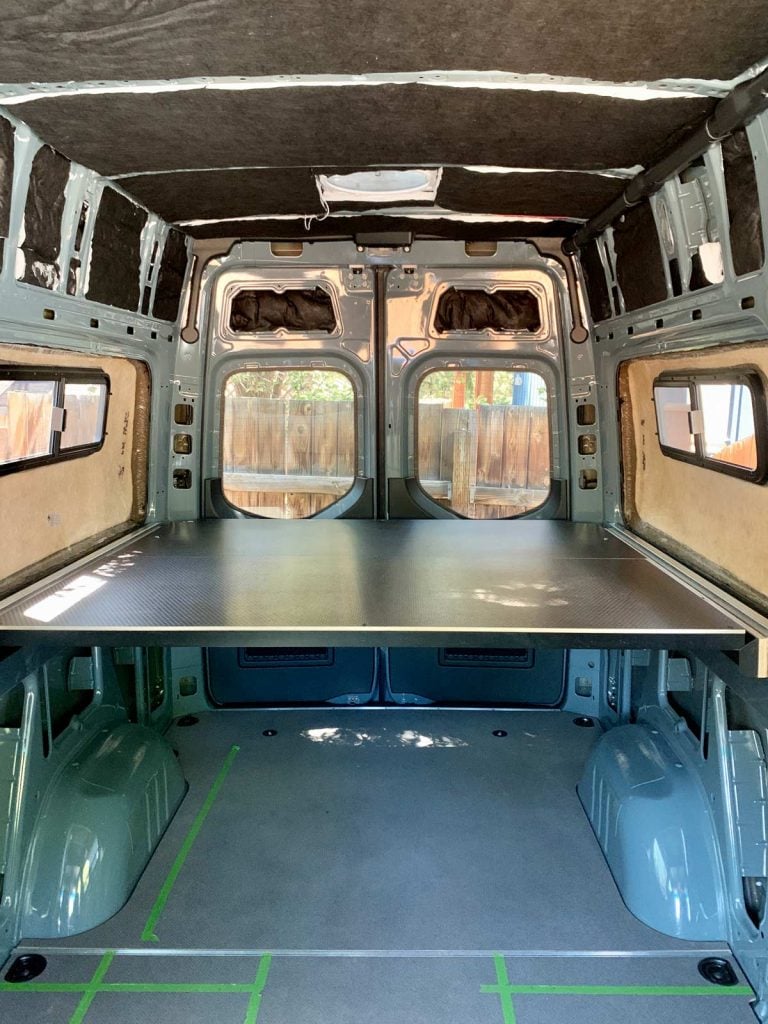
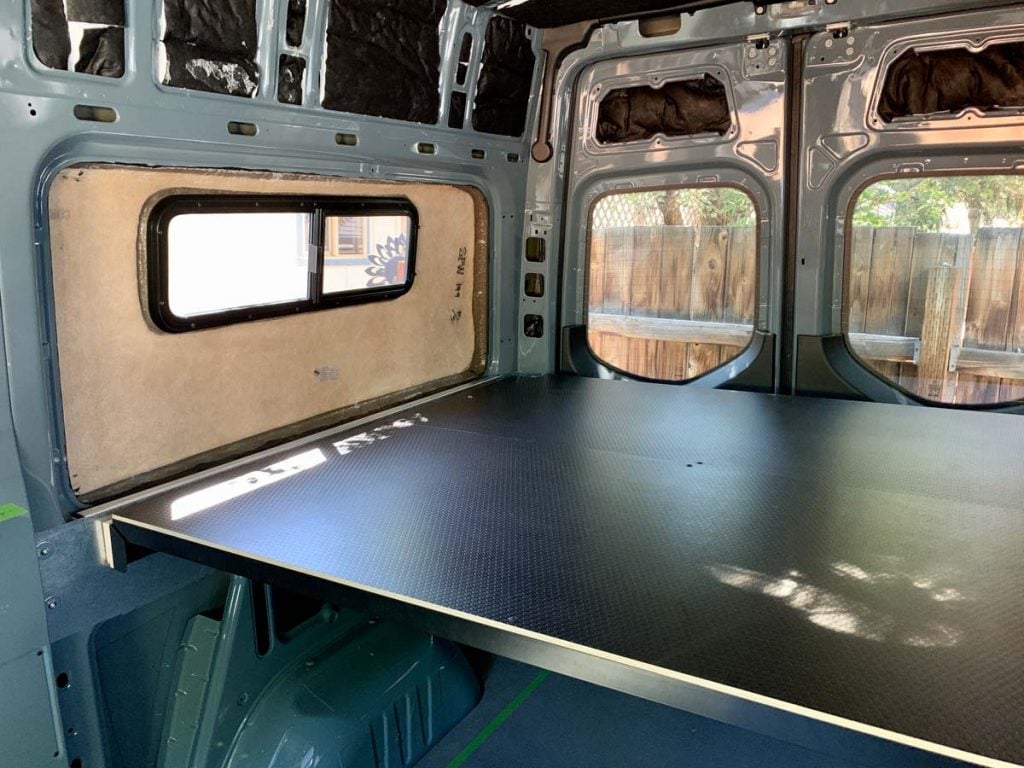
In addition to adding a heater, roof vent and opening windows, we also have Flarespace flares in our Sprinter van, and the new Flarespace bed that is designed specifically for use with the flares, enabling us to sleep in a large bed, sideways in our van, saving space in the van.
Click below to watch our video update for Part 3 of our build! Don’t forget to subscribe! 😉
When to DIY vs Working With An Experienced Van Conversion Company
We opted to work with a professional van conversion company for this stage of our van build – they installed our window, roof vent, heater and Flarespace flares for us. When it comes to cutting large holes in our brand new van, we opted to use the services of a professional who has done this many times before, has the right tools, workshop and experience to do a high-quality job, rather than attempting to do the installation ourselves and risking making a potentially very costly and traumatic mistake somewhere along the way. Here’s a great article on the Sprinter Campervans website that talks about the real costs that are worth considering when it comes to building your own DIY Sprinter Campervan, or any make/model van conversion for that matter.
The company we worked with is Esplori, who are based where we lived previously, in Bend, Oregon. Definitely give them a shout if you’re looking for a quality van conversion! Here is a list of some alternative van conversion companies that may be better suited to you depending on where you live in the world.
While it made sense to use to have an expert do these key pieces of the conversion up front, we are going to be doing the majority of the remaining work on the van ourselves, mainly because we have a very particular and specialist design (like nothing you’ve ever seen!) so we want to be doing all the design and installation to ensure it turns out exactly how we have envisaged and we have the satisfaction of learning and working through the project mostly ourselves.
If you’re about to embark on your own custom DIY van conversion, I recommend you read this article about the truly must-have tools for any DIY van conversion – the tools in that article are also useful for other projects you may have around the house and some will be essential to have with you in your van while adventuring, just incase you ever need to fix something while on the road.
What Esplori installed:
- Flarespace flares, including 2x slider windows in the flares
- CR Lawrence T-Vent window on the driver’s side
- Roof vent and fan
- Diesel heater
- Flarespace bed
What are the Advantages of Having Flares Installed in a Sprinter Campervan Conversion?
Many Sprinter van conversions have flares installed, yet many others we see (in real life and on Instagram) do not. So why spend the money installing flares on your van conversion? The main reason why you may want to consider having Flarespace flares installed when you are converting your cargo van into a campervan is that the flares create an additional few inches on either side of the van, allowing you to install an almost-full length bed sideways.
This means that you can sleep sideways, and your bed therefore takes up less length in the van, thus creating additional space for other aspects of your conversion, such as seating, the galley or storage (or a combination of the three). While this may not seem like that much of a difference, when you’re talking about a van with only around 60sqft of living space then saving several square feet for living rather than sleeping in can be a game-changer, especially if you’re set on having a fixed bed and large garage area underneath it.
Our bed, once installed sideways between the flares, will be the size of an ‘RV Queen’, which is the width of a regular US Queen-sized bed (60 inches) and 75 inches long. The length is 5 inches shorter than a regular Queen-sized bed. Neither of us are particularly tall, so the loss of some length is not an issue for us.
You may be wondering whether we think it was worth spending the money on installing Flarespace flares in our Sprinter van, when we could have put it towards simply buying a longer van. You’re talking a few thousand USD to get flares installed, especially if you also have a window or two, and if you also get the matching ‘trim rings’, that are designed to make finishing the interior that much easier once the flares are installed. Questioning how you spend your (presumably) hard-earned cash is a good point, however from our perspective, we specifically wanted a 144 wheelbase Sprinter van, rather than a 170 wheelbase, because it is easier to park (it will fit in a regular-sized parking space) and drive, so although we could have bought a longer van, we opted for a shorter van with the flares.
As we are happy with our choice to get a 144 rather than 170 wheelbase Sprinter van, having flares in the side of our van was worth the investment from our perspective, although it is certainly going to make the installation of our custom-designed walls a little more challenging, due to the differing wall depths and edges that we will need to work around. Flarespace supply parts called ‘trim rings’, which are fiberglass rings designed to sit over the edges of the flares on the inside of the van, however as explained in a subsequent post, these turned out, at least for us, to be a waste of money and time as it turns out they did not work with our bed (although it was from Flarespace and supposed to be compatible) or our wall and decor plans.
RELATED READING: See our HUGE finished Flarespace bed in our Van Build Part 6
Ensuring excellent ventilation in our Sprinter Van Conversion
Ventilation is one of the MOST important things to get right in a van conversion. Poor ventilation is a recipe for humidity, condensation, and the issues these can quickly create, such as mold and mildew. Sources of humidity in the air within your van may include:
- The climate – especially if you’re somewhere humid and tropical (hello Florida) or generally wet (typically anywhere that rains or snows a lot, such as the PNW and England)
- Wet clothes and shoes
- Cooking
- Breathing
- Sweating
Condensation will gather on the coldest surfaces, especially glass and metal, and can get behind your walls, under your mattress… basically anywhere you don’t want it to be, as the moisture sitting or pooling near the walls and floor can cause rust issues if it sits on the metal walls and fittings within your van.
The best way to ensure moisture has a suitable place to go is to have good ventilation in your van. For us, that meant installing a quality roof vent and fan, and side windows that open. When the fan is on, it pulls air (and the moisture it holds) out of the van, and if we have windows open, it pulls in the fresh air from outside.
Related Reading:


We opted for the MaxxAir MaxxFan 7500 as this fan has multiple speeds, can reverse directions, has remote control and rain sensors so it closes when it starts raining outside. The fan is installed above our bed area, as that is where we will spend hours every night breathing out air that needs ventilating, and should also create a nice draft while we are sleeping on hot nights.
Our van came with a fixed sliding door window, and two rear door windows. We had a full-size window installed on the front drivers-side, and smaller slider windows within each of the flares. This way we have multiple options for getting air into our van. While the glass surfaces of the windows are potentially places for moisture to condense on, we preferred to have the additional light, ventilation and aesthetics of the windows, which, to us, is worth having.
Other van build stages covered in this Part 3 update include…
- Installing sound deadening material on the walls, wheel wells and floors of our van
- Installing Thinsulate and floor insulation
- Installing an RB components overhead shelf in the driver’s cab
Looking for other posts in our luxury custom DIY Sprinter Van build series? Click the button below to see all van build and van life posts:
Efficiently heating our Sprinter Van
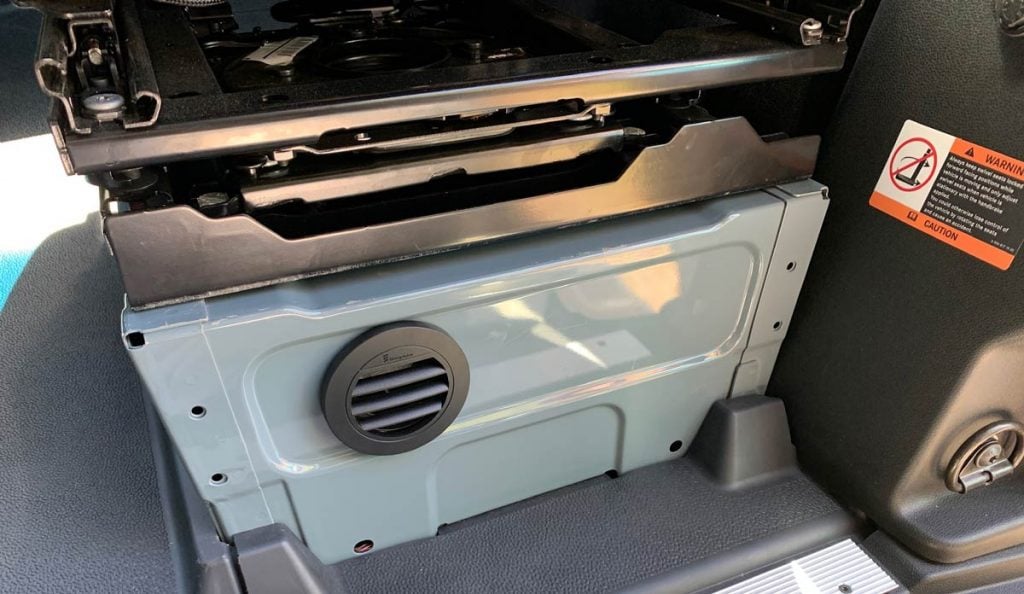
When finished, our van conversion is going to essentially be a luxury tiny home on wheels. We can’t really have a luxury tiny home on wheels if we’re going to be f-f-freezing when using it in winter and colder climates. The most effective way to heat a campervan conversion is by having a heater that is fuelled using the van’s diesel tank. The van doesn’t have to be on to use it, and the heater uses a minimal amount of electricity – this means it can be on through the night, if needed.
Our heater is neatly installed underneath the passenger seat base, so it takes up no additional room within the cargo section of the van. We chose an Eberspacher Espar Airtronic D2 air heater, which is thermostatically controlled, meaning we can set and control the temperature we want the heater to kick-in at.
Next Steps for our luxury tiny home build
These are the next steps for our Sprinter van to tiny home conversion, which we will be documenting in future YouTube videos and here on the blog. We’ll cover what materials we used (and why), and how we installed each of these stages. Don’t forget to subscribe to get notified of when these are published:
Related Reading:


- Platform bed installation
- Floor installation
- Plywood wall installation
- Tongue-and-groove wood paneling installation on the walls and ceiling
- Lining our Flarespace flares with our custom design trim rings
If you have any questions about our van and the conversion, drop us a comment and we’ll get back to you 🙂
DIY Sprinter Van Build Series on YouTube
To watch the whole DIY van build series and subscribe to our YouTube Channel for more videos, click the button below to head over to our van build playlist:
Hi Kate,
Thank you for the detail article. Its very helpful. How much did it cost to have that company do the install of just the flares and bed?
Hi Erin,
Not sure who Kate is but to answer your question we don’t have an exact break down in cost of the installation and parts as we got a few things done at the same time, including window installation. You can get a quote for the flares and bed from Flarespace and then you’ll need to contact your local van outfitter to get a quote on the install from them. They may actually be able to give you a quote direct if they work with Flarespace installs regularly.
Best,
Alastair
Hey Erin,
Thanks for sharing the article. This will be useful as I am a new transplant to Bend, OR. Where do you all live nowadays?
Hi Jeff,
Glad you enjoyed the article! Enjoy Bend! We now live in California.
Best,
Alastair